Setting Up Multi-Factor Authentication for Microsoft 365
Setting Up Multi-Factor Authentication for Microsoft 365
Multi-factor authentication is the single most impactful security measure you can implement for your Microsoft 365 environment. Microsoft reports that MFA blocks more than 99.9 percent of account compromise attacks. Yet many Australian businesses still have not enabled it.
If your business uses Microsoft 365 without MFA, every account is protected only by a password. Given that password reuse, phishing, and credential stuffing attacks are rampant, this is a significant risk that can be addressed today.
This guide walks you through the process of enabling MFA for your Australian business, from the simplest approach to more advanced configurations.
Understanding Your MFA Options
Microsoft 365 offers three approaches to MFA, each suited to different business needs:
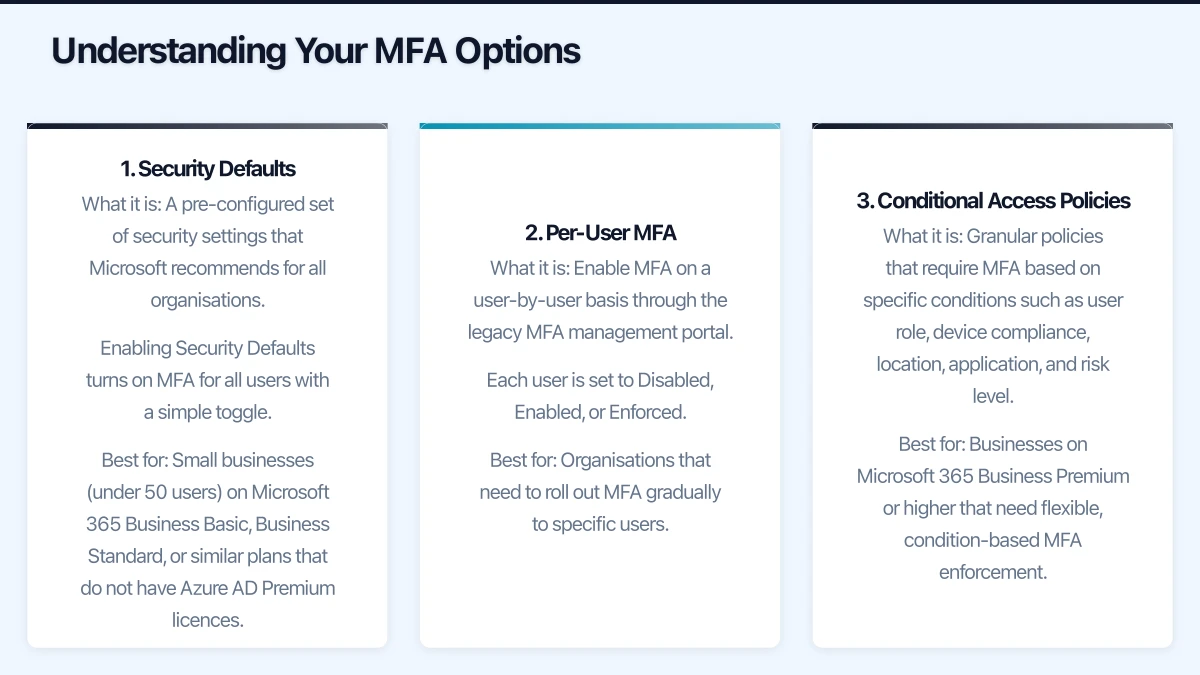
1. Security Defaults
What it is: A pre-configured set of security settings that Microsoft recommends for all organisations. Enabling Security Defaults turns on MFA for all users with a simple toggle.
Best for: Small businesses (under 50 users) on Microsoft 365 Business Basic, Business Standard, or similar plans that do not have Azure AD Premium licences.
Limitations:
- All-or-nothing approach (cannot exclude specific users)
- Uses Microsoft Authenticator app as the primary method
- Cannot customise policies (no location-based or device-based exceptions)
- Incompatible with Conditional Access policies
2. Per-User MFA
What it is: Enable MFA on a user-by-user basis through the legacy MFA management portal. Each user is set to Disabled, Enabled, or Enforced.
Best for: Organisations that need to roll out MFA gradually to specific users.
Limitations:
- Manual management for each user
- Limited flexibility (no conditional policies)
- Microsoft recommends Security Defaults or Conditional Access over per-user MFA
3. Conditional Access Policies
What it is: Granular policies that require MFA based on specific conditions such as user role, device compliance, location, application, and risk level.
Best for: Businesses on Microsoft 365 Business Premium or higher that need flexible, condition-based MFA enforcement.
Requirements: Azure AD Premium P1 licence (included in Microsoft 365 Business Premium, E3, and E5).
Advantages:
- Require MFA only when specific conditions are met
- Exempt trusted locations (your office network) from MFA prompts
- Require compliant devices for access
- Different policies for different user groups
- Block access entirely in high-risk scenarios
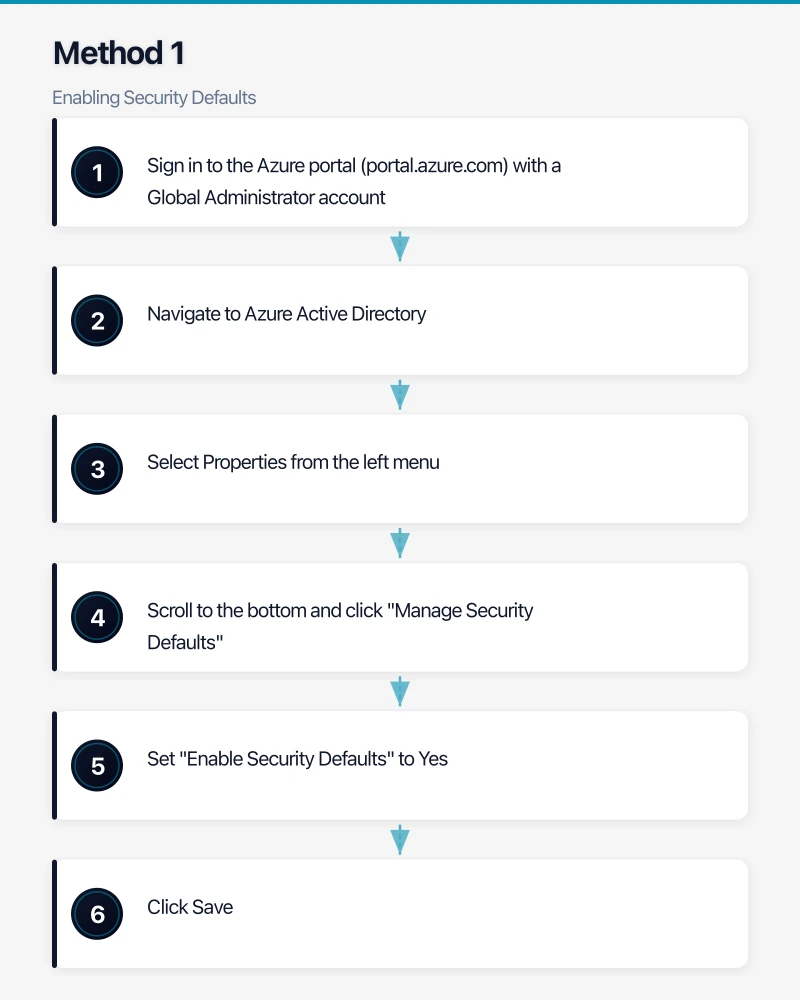
Method 1: Enabling Security Defaults
This is the quickest way to enable MFA for your entire organisation.
Step-by-Step
- Sign in to the Azure portal (portal.azure.com) with a Global Administrator account
- Navigate to Azure Active Directory
- Select Properties from the left menu
- Scroll to the bottom and click “Manage Security Defaults”
- Set “Enable Security Defaults” to Yes
- Click Save
What Happens Next
- All users will be prompted to register for MFA within 14 days of their next sign-in
- Users will be required to use the Microsoft Authenticator app or another supported method
- Legacy authentication protocols (POP3, IMAP, SMTP basic auth) will be blocked
- Administrators will be required to perform MFA on every sign-in
Communicating to Your Team
Before enabling Security Defaults, notify your staff. Send a communication that covers:
- What MFA is and why it matters
- That they will be prompted to set up MFA on their next sign-in
- Instructions for installing Microsoft Authenticator on their phone (available on iOS and Android)
- Who to contact if they have questions or issues
- A timeline (e.g., “Starting Monday, you will be prompted to set up MFA”)
Sample communication:
Subject: Important Security Update — Multi-Factor Authentication
Team,
To protect our business from cyber threats, we are enabling multi-factor authentication (MFA) on our Microsoft 365 accounts starting [date].
What this means: When you sign in, you will occasionally be asked to verify your identity using your mobile phone, in addition to your password. This adds a critical layer of security to your account.
What you need to do:
- Install the Microsoft Authenticator app on your phone from the App Store or Google Play
- When you next sign in to Microsoft 365, follow the prompts to set up MFA
- Keep your phone accessible when signing in to Microsoft services
If you have any questions, please contact [IT support contact].
This change protects both your personal information and our business data.
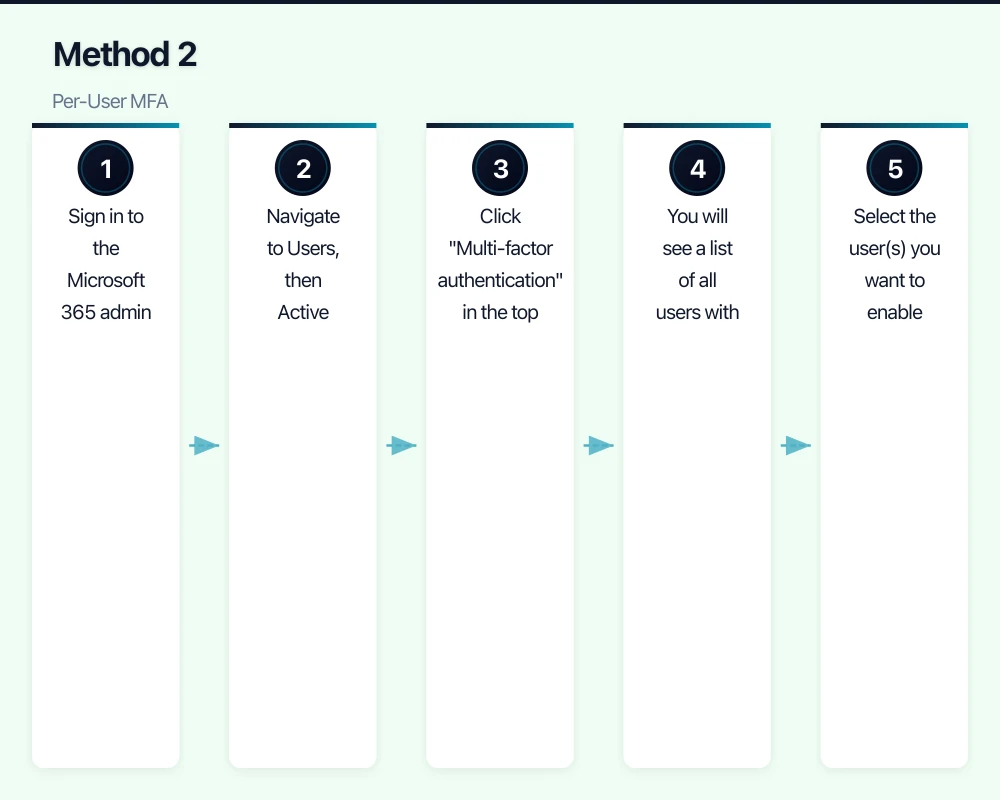
Method 2: Per-User MFA
If you need to enable MFA for specific users rather than the entire organisation:
Step-by-Step
- Sign in to the Microsoft 365 admin centre (admin.microsoft.com)
- Navigate to Users, then Active Users
- Click “Multi-factor authentication” in the top menu (or select “Per-user MFA” from the menu)
- You will see a list of all users with their MFA status
- Select the user(s) you want to enable
- Click “Enable” in the right panel
- Confirm the action
MFA Status Meanings
- Disabled: MFA is not enabled for the user
- Enabled: The user has been enrolled but has not completed MFA registration. They will be prompted on next sign-in.
- Enforced: The user has completed registration and must use MFA for all sign-ins.
After a user completes their MFA setup, their status automatically changes from Enabled to Enforced.
Rollout Strategy
For a phased rollout:
Week 1: Enable MFA for IT administrators and Global Admins (highest-risk accounts)
Week 2: Enable MFA for finance and management staff (access to sensitive financial data)
Week 3: Enable MFA for all remaining staff
Week 4: Verify all users are in Enforced status and address any holdouts
Method 3: Conditional Access Policies
For businesses with Azure AD Premium P1 (included in Microsoft 365 Business Premium):
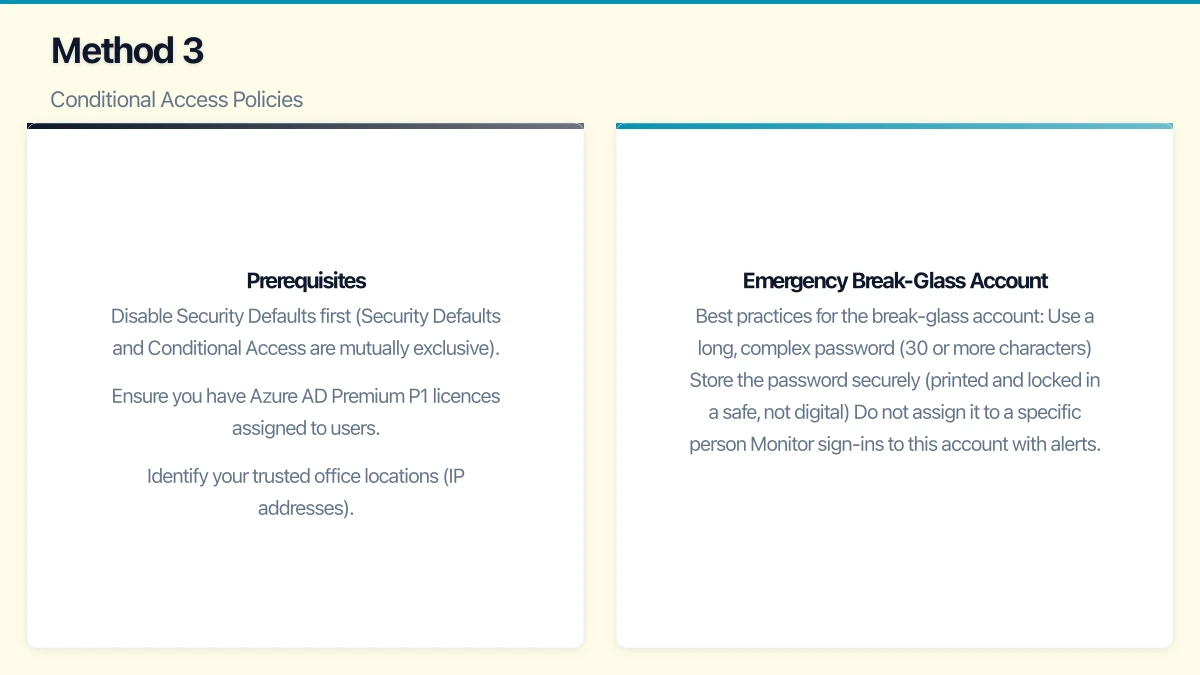
Prerequisites
- Disable Security Defaults first (Security Defaults and Conditional Access are mutually exclusive)
- Ensure you have Azure AD Premium P1 licences assigned to users
- Identify your trusted office locations (IP addresses)
Creating a Basic MFA Policy
- Sign in to the Azure portal (portal.azure.com)
- Navigate to Azure Active Directory, then Security, then Conditional Access
- Click “New policy”
- Name the policy: “Require MFA for all users”
- Assignments - Users: Select “All users.” Exclude a break-glass emergency access account (see below).
- Assignments - Cloud apps: Select “All cloud apps”
- Conditions: Leave default (all conditions)
- Access controls - Grant: Select “Require multi-factor authentication”
- Set the policy to “Report-only” first to evaluate impact
- After reviewing the report-only results for a few days, switch to “On”
Creating a Location-Based Policy
To skip MFA when users are in your office:
-
First, create a Named Location:
- Go to Azure AD, Security, Conditional Access, Named Locations
- Click “New location”
- Name it (e.g., “Sydney Office”)
- Enter your office’s public IP address or range
- Mark it as a trusted location
-
Then modify your MFA policy:
- Edit the MFA policy
- Under Conditions, select Locations
- Set “Configure” to Yes
- Under Exclude, select your trusted office location
- Save
Now users in the office connect without MFA prompts, but remote users must complete MFA. This balances security with user convenience.
Emergency Break-Glass Account
Always maintain at least one emergency access account that is excluded from Conditional Access policies. This account ensures you can access your tenant if MFA or Conditional Access has issues.
Best practices for the break-glass account:
- Use a long, complex password (30 or more characters)
- Store the password securely (printed and locked in a safe, not digital)
- Do not assign it to a specific person
- Monitor sign-ins to this account with alerts
- Exclude it from all Conditional Access policies
- Test it periodically to ensure it works
Choosing MFA Methods
Microsoft 365 supports several MFA verification methods:
Microsoft Authenticator App (Recommended)
The most secure and convenient method. Users approve sign-in requests with a tap on their phone. Supports number matching for additional security.
SMS Verification
A code is sent via text message. Convenient but less secure than the Authenticator app due to SIM-swapping risks. The ACSC advises against relying solely on SMS for MFA.
Phone Call
An automated call asks the user to press a key to verify. Similar security concerns as SMS.
FIDO2 Security Keys
Physical hardware keys (such as YubiKey) that provide the strongest MFA. Ideal for administrator accounts and high-security environments. Cost AUD 50 to 100 per key.
Windows Hello for Business
Biometric (fingerprint or facial recognition) or PIN-based authentication for Windows devices. Strong security with excellent user experience.
Recommendation for Australian SMBs: Make Microsoft Authenticator the default method. For administrator accounts, consider FIDO2 security keys as an additional measure.
Troubleshooting Common Issues
”I forgot my phone”
If a user cannot access their MFA method:
- Administrators can temporarily reset their MFA registration
- Implement alternative methods (office phone as backup)
- For Conditional Access, consider a temporary exemption policy
Legacy Applications Breaking
Some older applications do not support modern authentication and will break when legacy authentication is blocked. Common examples:
- Older email clients (Outlook 2010 and earlier)
- Some multifunction printers that scan to email
- Legacy line-of-business applications using basic SMTP
Solutions:
- Upgrade to current software versions that support modern authentication
- For printers and scanners, create app passwords or configure SMTP relay through Exchange Online
- For legacy applications, evaluate alternatives or create specific Conditional Access exceptions (with compensating controls)
User Resistance
Some staff will resist MFA as inconvenient. Address this by:
- Explaining the security risks (use Australian breach examples)
- Demonstrating that MFA prompts are infrequent (especially with trusted locations)
- Highlighting that their personal accounts are also at risk without MFA
- Making it a policy requirement, not optional
After Enabling MFA
Monitor and Report
- Review the Azure AD sign-in logs for MFA-related failures
- Check the MFA registration report to confirm all users have registered
- Monitor for accounts still using legacy authentication
Regular Maintenance
- Onboarding: Include MFA setup in your new starter process
- Offboarding: MFA registration is automatically removed with the account
- Device changes: Users can update their MFA methods at aka.ms/mfasetup
- Periodic review: Verify MFA policies remain effective and adjust as your environment changes
Next Steps After MFA
MFA is your foundation. Build on it with:
- Conditional Access policies for granular control
- Device compliance requirements
- Application protection policies
- Security awareness training for staff
- Regular phishing simulation exercises
MFA is not a silver bullet, but it is the closest thing cybersecurity has to one. For Australian businesses using Microsoft 365, there is no valid reason not to enable it today. The process takes an hour to implement, and the security benefit is transformative.
For executive-level thinking on technology investment and digital strategy, explore Ash Ganda’s blog on enterprise innovation.
This article is brought to you by Ganda Tech Services — Sydney’s complete digital solutions provider covering cloud, web, and mobile.