Securing Australian Business Email: DMARC and SPF Setup

Securing Australian Business Email: DMARC and SPF Setup
Email remains the primary attack vector for Australian businesses. Phishing, business email compromise (BEC), and domain spoofing account for billions of dollars in losses globally, and Australian businesses are not immune. The ACSC consistently highlights email-based attacks as one of the top threats to Australian organisations.
Three email authentication protocols — SPF, DKIM, and DMARC — work together to protect your domain from being used by attackers to send fake emails. Yet many Australian small businesses have not implemented them, or have set them up incorrectly. This guide walks you through getting all three right.
Understanding the Three Protocols
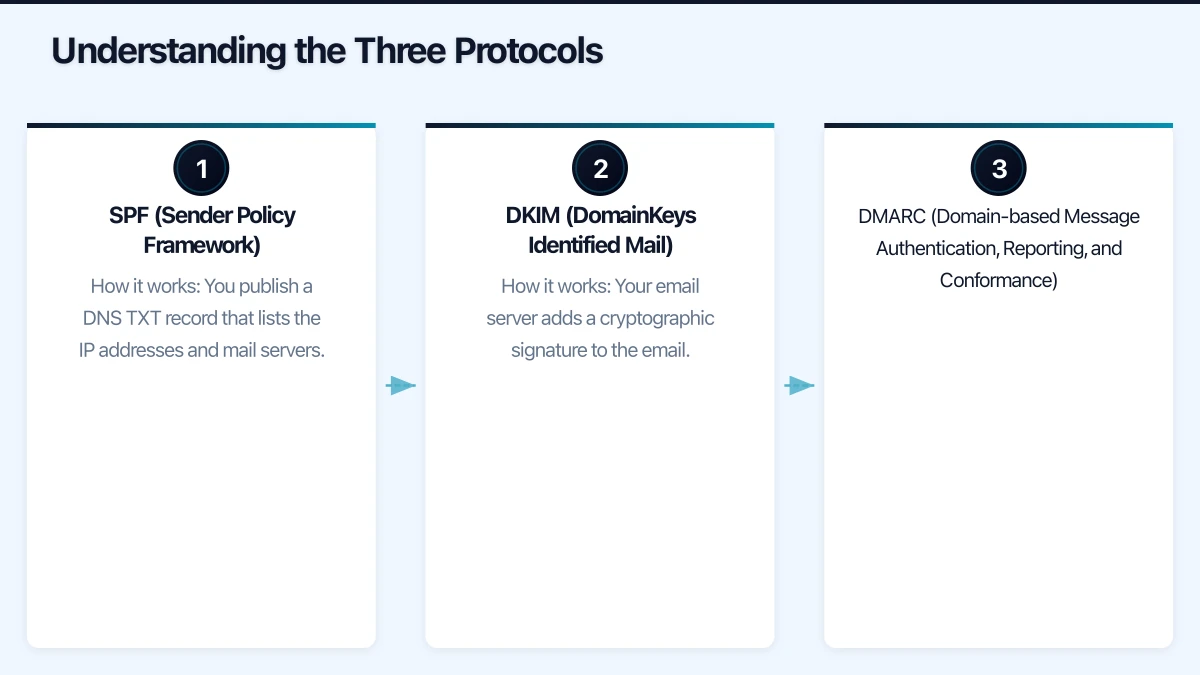
SPF (Sender Policy Framework)
SPF tells receiving email servers which servers are authorised to send email on behalf of your domain.
How it works: You publish a DNS TXT record that lists the IP addresses and mail servers permitted to send email as @yourdomain.com.au. When someone receives an email claiming to be from your domain, their mail server checks your SPF record. If the sending server is not listed, the email fails SPF authentication.
What it prevents: Attackers sending email from unauthorised servers using your domain name.
DKIM (DomainKeys Identified Mail)
DKIM adds a digital signature to every outgoing email, proving the email was sent by an authorised server and has not been modified in transit.
How it works: Your email server adds a cryptographic signature to the email header using a private key. The corresponding public key is published in your DNS. Receiving servers use the public key to verify the signature.
What it prevents: Email tampering in transit and adds another layer of sender verification.
DMARC (Domain-based Message Authentication, Reporting, and Conformance)
DMARC ties SPF and DKIM together and tells receiving servers what to do when an email fails authentication.
How it works: You publish a DNS TXT record specifying:
- Whether to check SPF, DKIM, or both
- What to do with failing emails (none, quarantine, or reject)
- Where to send reports about authentication results
What it prevents: When fully implemented, DMARC prevents anyone from sending email that appears to come from your domain unless it passes SPF and DKIM checks.
Step 1: Set Up SPF
For Microsoft 365 Users
If your business uses Microsoft 365 for email, your SPF record should include Microsoft’s servers.
Basic SPF record for Microsoft 365:
v=spf1 include:spf.protection.outlook.com -allThis record says: “Only Microsoft 365 servers are authorised to send email for our domain. Reject all others.”
If you also send email from other sources (for example, a marketing platform like Mailchimp, or a web server that sends notification emails), include those too:
v=spf1 include:spf.protection.outlook.com include:servers.mcsv.net include:_spf.google.com -allSPF Configuration Steps
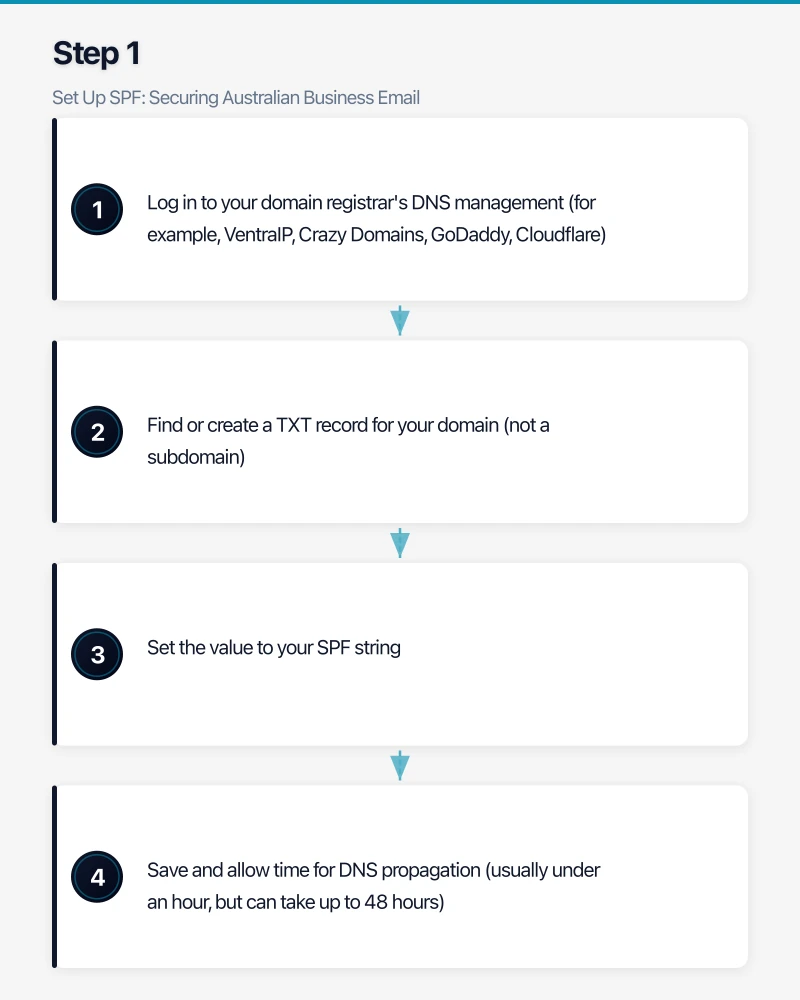
- Log in to your domain registrar’s DNS management (for example, VentraIP, Crazy Domains, GoDaddy, Cloudflare)
- Find or create a TXT record for your domain (not a subdomain)
- Set the value to your SPF string
- Save and allow time for DNS propagation (usually under an hour, but can take up to 48 hours)
SPF Best Practices
- Use
-all(hard fail) rather than~all(soft fail). Hard fail tells receiving servers to reject unauthorised emails. Soft fail merely flags them, which provides weaker protection. - Do not exceed 10 DNS lookups. SPF has a limit of 10 DNS lookups. Each
include:directive triggers a lookup. If you exceed 10, your SPF record becomes invalid. Use tools like MXToolbox to check your lookup count. - Include every legitimate sender. Before setting
-all, make sure you have identified every system that sends email using your domain: marketing platforms, CRM, helpdesk, invoicing software, printers/scanners, web applications.
Common Australian Services and Their SPF Includes
| Service | SPF Include |
|---|---|
| Microsoft 365 | include:spf.protection.outlook.com |
| Google Workspace | include:_spf.google.com |
| Mailchimp | include:servers.mcsv.net |
| Campaign Monitor | include:cmail1.com |
| Xero | include:mxrecord.mx |
| Freshdesk | include:email.freshdesk.com |
| SendGrid | include:sendgrid.net |
| HubSpot | include:hubspot.com |
Step 2: Set Up DKIM
For Microsoft 365
Microsoft 365 supports DKIM signing for custom domains. Here is how to enable it:
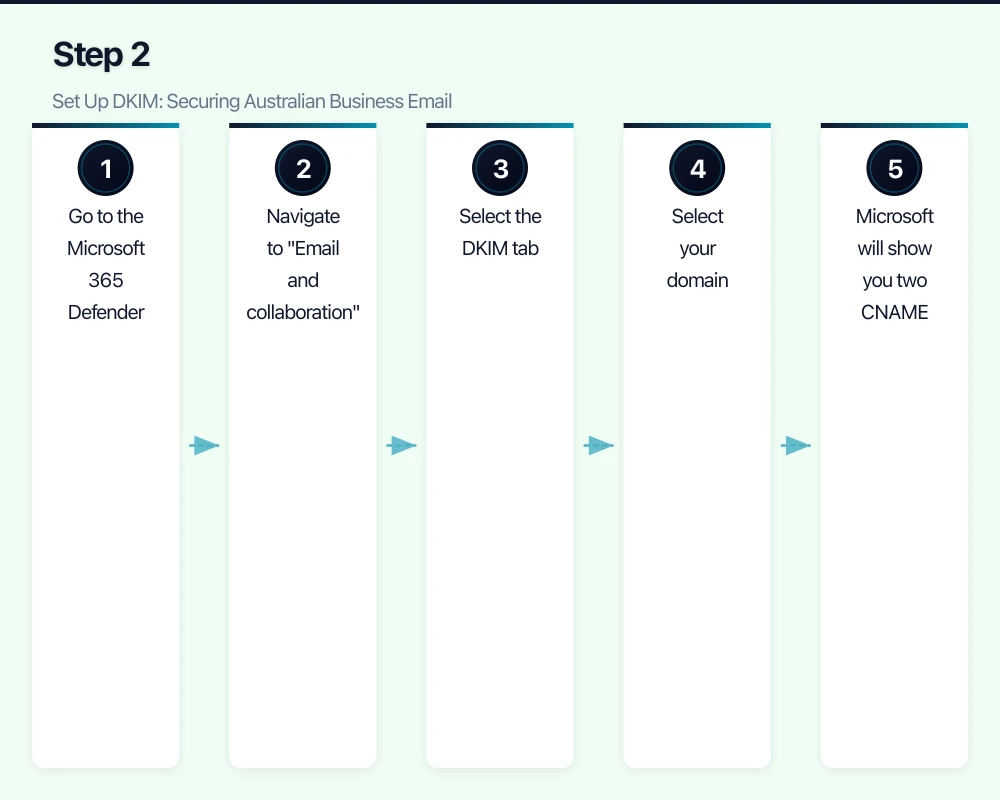
- Go to the Microsoft 365 Defender portal (security.microsoft.com)
- Navigate to “Email and collaboration” then “Policies and rules” then “Threat policies” then “Email authentication settings”
- Select the DKIM tab
- Select your domain
- Microsoft will show you two CNAME records to add to your DNS:
- selector1._domainkey.yourdomain.com.au pointing to selector1-yourdomain-com-au._domainkey.yourtenant.onmicrosoft.com
- selector2._domainkey.yourdomain.com.au pointing to selector2-yourdomain-com-au._domainkey.yourtenant.onmicrosoft.com
- Add these CNAME records to your DNS
- After DNS propagation, return to the Defender portal and enable DKIM signing
For Google Workspace
- Go to the Google Workspace admin console
- Navigate to “Apps” then “Google Workspace” then “Gmail” then “Authenticate email”
- Select your domain and generate a DKIM key
- Add the provided TXT record to your DNS
- Enable DKIM signing after DNS propagation
Verify DKIM
Send a test email to an external address and check the email headers. Look for dkim=pass in the Authentication-Results header.
Step 3: Set Up DMARC
DMARC should be implemented gradually. Jumping straight to a reject policy without monitoring can cause legitimate emails to be blocked.
Phase 1: Monitor Only (Weeks 1-4)
Start with a monitoring policy that does not affect email delivery but sends you reports:
v=DMARC1; p=none; rua=mailto:[email protected]; ruf=mailto:[email protected]; pct=100What this does:
p=none— take no action on failing emails (just report)rua=— send aggregate reports to this addressruf=— send forensic (detailed failure) reports to this addresspct=100— apply to 100% of emails
Add this record:
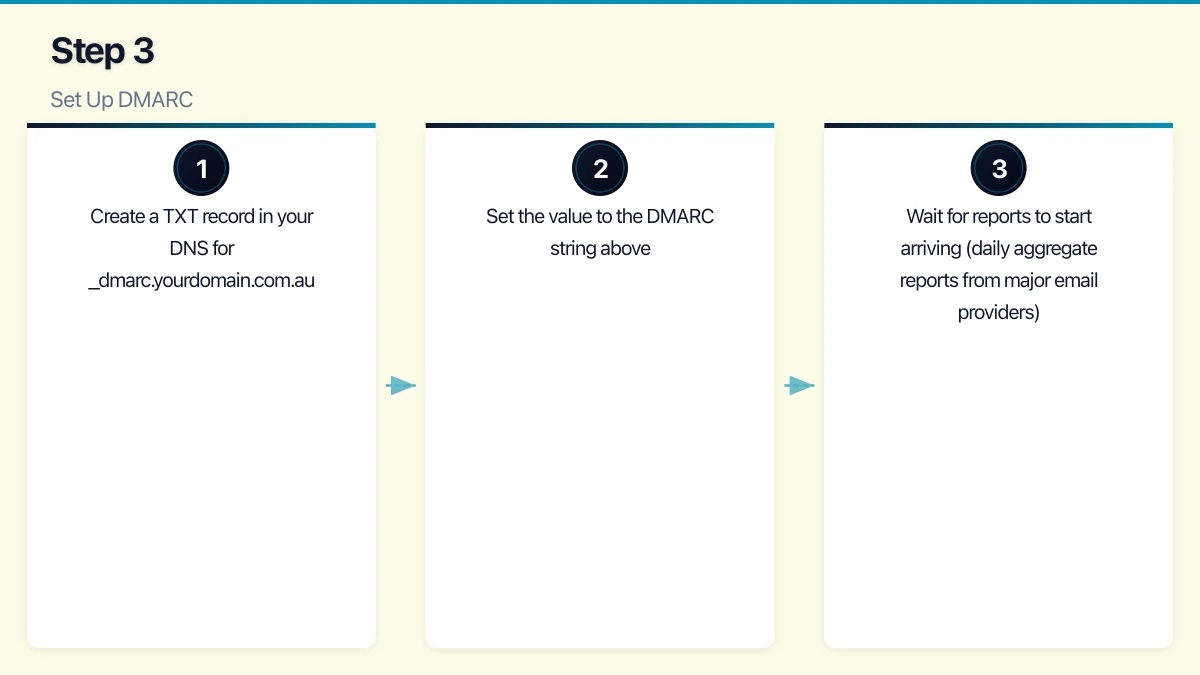
- Create a TXT record in your DNS for
_dmarc.yourdomain.com.au - Set the value to the DMARC string above
- Wait for reports to start arriving (daily aggregate reports from major email providers)
Phase 2: Analyse Reports (Weeks 2-6)
DMARC aggregate reports are XML files that show which servers sent email using your domain and whether they passed SPF and DKIM.
Reading raw XML reports is tedious. Use a free DMARC report analysis tool:
- DMARC Analyzer: Free tier available
- Postmark DMARC: Free weekly digest reports
- MXToolbox DMARC Report Analyzer: Free tool to parse XML reports
What to look for:
- Legitimate sources that are failing SPF or DKIM (update your SPF record or configure DKIM for these sources)
- Unauthorised sources attempting to send email as your domain (this is what DMARC is designed to catch)
- Volume of email sent using your domain from each source
Phase 3: Quarantine (Weeks 6-10)
Once you are confident that all legitimate email sources pass SPF and DKIM, move to quarantine:
v=DMARC1; p=quarantine; rua=mailto:[email protected]; pct=25Start at pct=25 (apply to 25% of failing emails) and increase gradually to 100% over several weeks. Quarantined emails go to the recipient’s spam/junk folder rather than being rejected outright.
Phase 4: Reject (Week 10+)
When you are confident the quarantine policy is working correctly:
v=DMARC1; p=reject; rua=mailto:[email protected]; pct=100This is the strongest protection. Emails that fail both SPF and DKIM alignment are rejected by the receiving server.
Testing Your Configuration
After each step, verify your configuration using these free tools:
- MXToolbox (mxtoolbox.com): Check SPF, DKIM, and DMARC records
- Google Admin Toolbox (toolbox.googleapps.com/apps/checkmx): Comprehensive email configuration check
- Mail Tester (mail-tester.com): Send a test email and receive a score with specific improvement recommendations
- DMARC Inspector (dmarcian.com): Analyse your DMARC configuration
Common Issues and Solutions
SPF “too many DNS lookups” error: If you have many services sending email, you may exceed the 10-lookup limit. Solutions:
- Remove services that no longer send email for your domain
- Use IP addresses instead of
include:directives where possible - Consider an SPF flattening service (though this has its own complexities)
DKIM signature not appearing: Verify the CNAME or TXT records are correctly published. DNS propagation can take up to 48 hours. Use a DNS checker tool to verify.
Legitimate emails failing DMARC: Usually caused by email forwarding. When emails are forwarded, the sending IP changes, breaking SPF. DKIM survives forwarding if the message is not modified. This is why having both SPF and DKIM is important — DMARC passes if either one aligns.
Third-party services failing DKIM: Some services (marketing platforms, invoicing software) send email “on behalf of” your domain. Ensure these services support DKIM signing with your domain’s keys, or that they are included in your SPF record.
The Business Case
Implementing SPF, DKIM, and DMARC is free (aside from your time). The benefits are significant:
- Prevent domain spoofing: Attackers cannot send convincing fake emails using your domain
- Improve email deliverability: Properly authenticated emails are less likely to be marked as spam
- Protect your reputation: If your domain is used for spam or phishing, your legitimate emails suffer
- Meet compliance expectations: Several Australian industry frameworks and government requirements expect email authentication
Ongoing Maintenance
Email authentication is not set-and-forget:
- When adding new services that send email: Update your SPF record and configure DKIM
- Monthly: Review DMARC reports for anomalies
- Annually: Verify all SPF includes are still needed and that DKIM keys are current
Implementing SPF, DKIM, and DMARC is one of the most effective and cost-efficient security measures an Australian business can take. It protects your domain, your customers, and your reputation. Start today with SPF, add DKIM, then implement DMARC in monitoring mode. Within three months, you can have full email authentication in place.
Looking beyond the technical to the strategic? Ash Ganda writes about how CTOs and business leaders can drive digital transformation.
Part of the Ganda Tech Services family, Cloud Geeks delivers specialist IT and cloud solutions for Australian small and medium businesses.